You can set up scheduled times to run any of the reports and have them sent to your email inbox, to your FTP server, or to hosted SFTP.
From the top navigation bar, select Reports → More Reports.
Select the report you want to schedule.
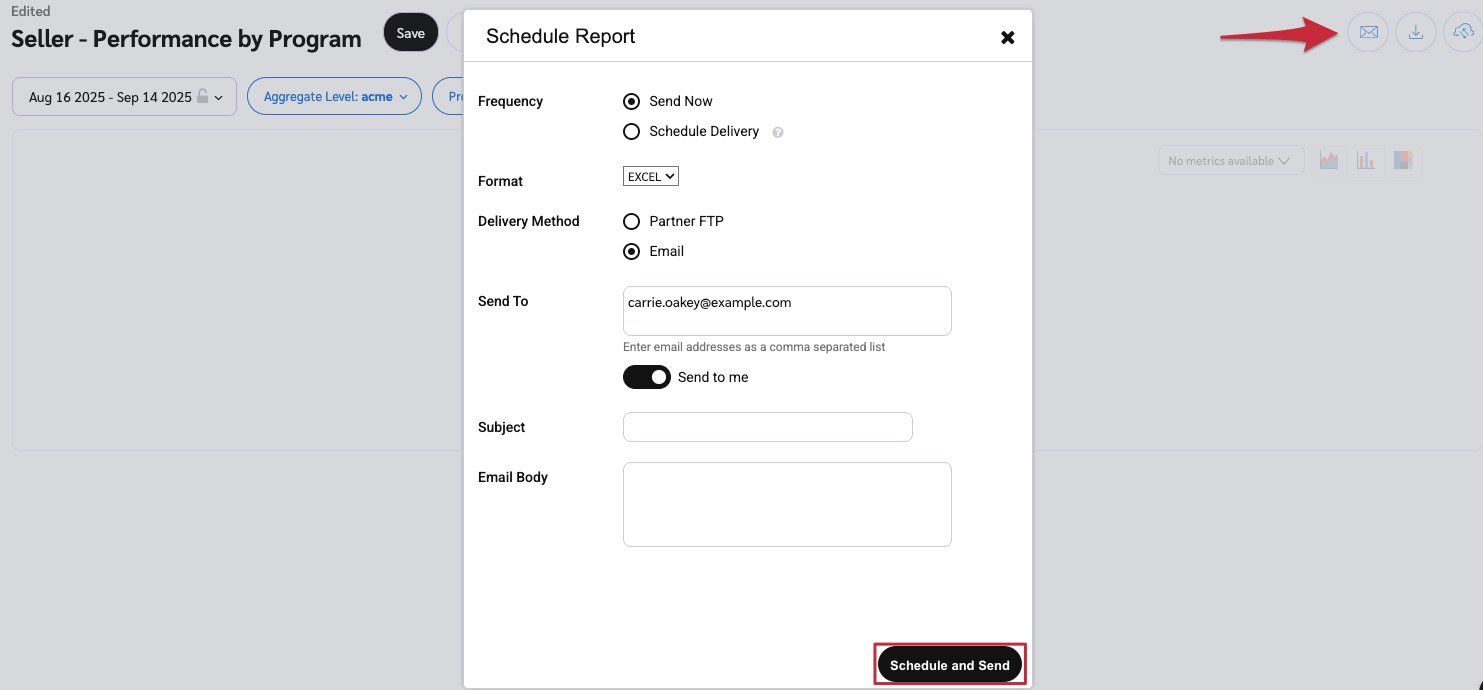
In the top right corner, select
[Schedule].
Set the settings of the report.
How often you want the report generated.
The format of the report. Choose between Excel, CSV, or PDF.
Where you want the report to be delivered. Choose between Partner FTP, Email or Hosted SFTP. Refer to the tabs below for descriptions of each delivery method.
If you choose to have your reports sent via FTP, a folder will be sent to your FTP server, where you can then access the report.
Delivery method field
Description
Server URL
Select the server protocol in which you want to receive FTP files (FTP, SFTP, or FTPS), then enter your server URL.
Directory
Indicate here if you have a specific directory you want reports to be placed in (e.g., /impact/reports/).
Port
Specify the port that your server listens to for new control connections. Post 21 is typical for nonsecure and explicitly secure connections. Port 990 is typical for implicitly secure connections.
Username
Enter the username that impact.com uses to log into the FTP server.
Password
Enter the password that impact.com uses to log into the FTP server.
If you choose to have your reports sent via email, the report will be uploaded to Google Cloud, and you will receive an email with a link that points to the report.
Delivery method field
Description
Send To
Create a CSV of the email addresses where you want to receive this report. Select Send to Me to have the report sent to the email tied to your impact.com account.
Subject
Enter the email subject line.
Email body
Enter the plain text message.
If you select Hosted SFTP, the file will be sent to a hosted location for you.
When connecting to hosted SFTP, you can either make use of an existing connection or create a new one, by selecting Create new... and filling in the following fields:
Delivery method field
Description
Connection User
Select an existing user, or create a new user to connect with.
Display Name
Enter the name to be displayed.
Public Key
[Toggle on] to enter the public key. If you don't enter a public key, a password will be generated for you and displayed when the new connection is created.
Connection Name
Enter a name for the connection.
Select Schedule and Send.

From the top navigation bar, select Reports → Scheduled Reports.
Navigate to the scheduled report you want to edit and select
[Drop-down menu] under the Actions column.
Change delivery settings and report content, pause report generation, delete the report scheduling settings, or run the report right now.