
Upgrade: This feature is available for free with Trackonomics Essentials. To access it, along with a suite of additional tools to grow your program, activate Trackonomics Essentials today.
You can integrate your various tracking networks within impact.com with Trackonomics Essentials. Trackonomics Essentials allows you to manage your work across multiple affiliate networks without ever leaving the impact.com platform. You can view performance reports, gain insights, and create tracking links for all of your brands across all the networks you've joined.
Integrate your network
 This feature is only accessible to specific impact.com editions or add-ons. Contact us to upgrade your account and get access!
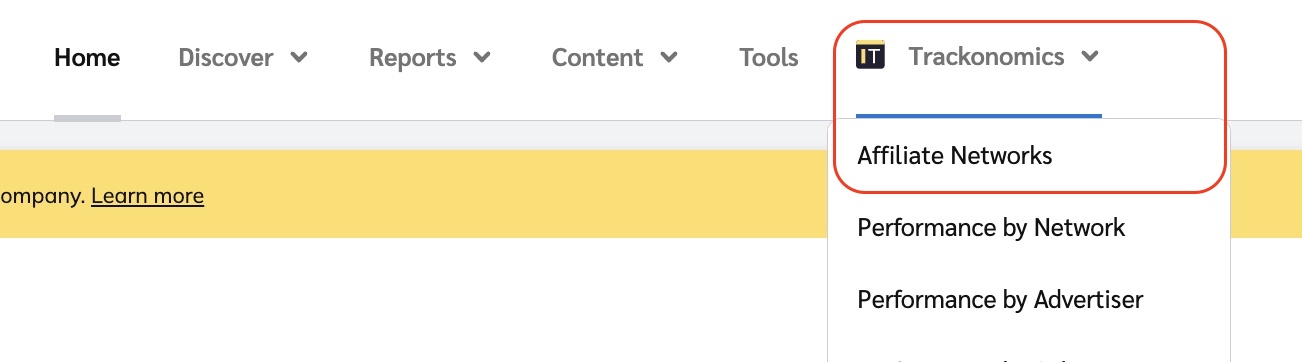
From the top navigation bar, select Trackonomics → Affiliate Networks.
Select Add Network in the top right corner.
Select the relevant network that you'd like to integrate from the list.
Alternatively, use the search bar to find the relevant network quickly.

Once you have chosen the relevant platform, refer to the tabs below for the relevant integration steps you'll need to set up your network:
Nickname: A nickname allows you to override the default platform name with something more meaningful to you. This can be useful if you have multiple accounts on the same platform.
API Token: To find your API Token, log in to your AdTraction account, then follow the steps below:
In the left navigation menu, select Account → Settings → API.
Here you will find your API Token. If you have not yet got an API key, select Create new API key to generate one.
Select Save tab once done.

What currency does this platform report in?: An ISO 4217 currency code
![[External link]](https://paligoapp-cdn-eu1.s3.eu-west-1.amazonaws.com/impact/attachments/f01cdffa431a4d75ff09c130b66974d4-b8ebe06c75d53cc8d24756ae9b7589e2.svg) is required (e.g., USD, EUR, GBP, etc.). Select the currency that is displayed in your AdTraction account.
is required (e.g., USD, EUR, GBP, etc.). Select the currency that is displayed in your AdTraction account.
Step 1: Set up your data source
Nickname: A nickname allows you to override the default platform name with something more meaningful to you. This can be useful if you have multiple accounts on the same platform.
Store ID: Your store ID can be found within your Amazon Associate account. For US partners, your store ID will end in -20, and for UK partners, your store ID will end in -21.
ISO 4217 currency code: An ISO 4217 currency code
is required (i.e., USD, EUR, GBP, etc.).Affiliate Program: From the
![[Drop-down menu]](https://paligoapp-cdn-eu1.s3.eu-west-1.amazonaws.com/impact/attachments/f01cdffa431a4d75ff09c130b66974d4-d6b35853a9aa1f1fe6bd66da29bd09fa.svg) [Drop-down menu], select the Amazon Associates Affiliate program to which you want to add data.
[Drop-down menu], select the Amazon Associates Affiliate program to which you want to add data.
Step 2: Upload your data
Once you’ve integrated your Amazon network with impact.com, you will need to retrieve your data from Amazon directly and manually upload your data to impact.com. This is because Amazon doesn’t allow 3rd parties to connect directly to their data feed.
Log in to your Amazon account.
From the top navigation menu, select Reports and then Download Reports.
In the pop-up screen, select the date range of the reports you want to download.
If you are uploading data to impact.com for the first time or if you want to upload more historical data, you are recommended to download 3 months’ worth of data from Amazon at a time. The maximum file size you can upload is 50MB. If you have a very large program with Amazon, you may need to choose a shorter date range.
Select all the available
![[Unchecked box]](https://paligoapp-cdn-eu1.s3.eu-west-1.amazonaws.com/impact/attachments/f01cdffa431a4d75ff09c130b66974d4-396370c2cdec89ba7d714c4c58e6845b.svg) [Checkboxes].
[Checkboxes].Select
![[Radio button]](https://paligoapp-cdn-eu1.s3.eu-west-1.amazonaws.com/impact/attachments/f01cdffa431a4d75ff09c130b66974d4-b7d91d1c012267bd96951fe6c2b643a4.svg) [Radio button] XLSX as the Format.
[Radio button] XLSX as the Format.Select Generate Reports.
Once your reports are ready, you’ll see them in the Available Reports table. Select Download for each report, and a .zip file will be downloaded.
Navigate to your impact.com account → Trackonomics → Affiliate Networks.
Hover over the Amazon network and select
![[More] vNext](https://paligoapp-cdn-eu1.s3.eu-west-1.amazonaws.com/impact/attachments/f01cdffa431a4d75ff09c130b66974d4-73f43076a692f2dcc8960037fabdca9c.svg) [More].
[More].Select Upload Data and upload your .zip file.
Nickname: A nickname allows you to override the default platform name with something more meaningful to you. This can be useful if you have multiple accounts on the same platform.
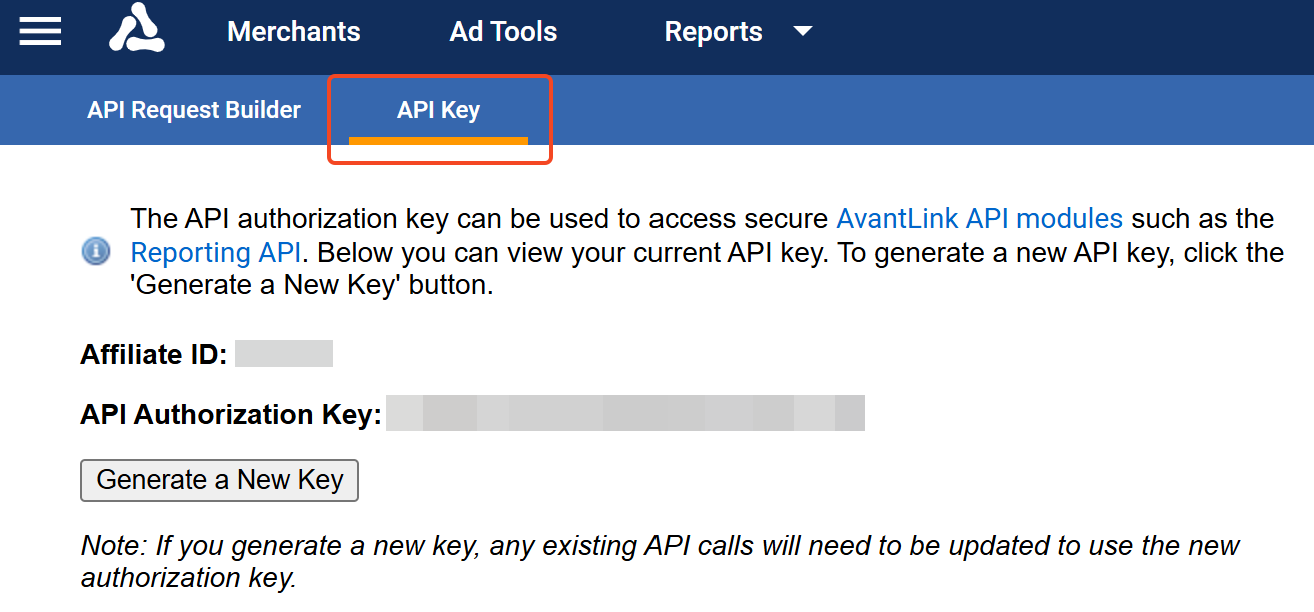
Affiliate ID and API Authorization Key:
Log in to your AvantLink account and navigate to the Ad Tools section.
Next, scroll down until you see AvantLink API , and then select Create.

Select the API Key tab to view your API key. If an API key is not displayed, select Generate a New Key.
Nickname: A nickname allows you to override the default platform name with something more meaningful to you. This can be useful if you have multiple accounts on the same platform.
API Key:
In the top right menu bar, select API Credentials.

To get your OAuth2 Token, enter your login password, then select Show my API Token.
Copy the API Token and paste it into the onboarding form.

Find your timezone:
On the main page, select an account name.
Select Account → Regions.
Scroll down to find your primary timezone, then select the same timezone in the onboarding form.

Nickname: A nickname allows you to override the default platform name with something more meaningful to you. This can be useful if you have multiple accounts on the same platform.
Username: Enter the Username you use to log in to your CJ account.
Password: Enter the Password you use to log in to your CJ account.
Personal Access Token:
Your Personal Access Token is obtainable through the CJ developer portal
.Make sure you are logged in. If you are not yet logged in, select Click here to log in on the locked message that will appear.

Once you are logged in, select Register a New Personal Access Token.
Input Trackonomics as the Token name and then select REGISTER.

A 26-character token will be displayed. Once you close the dialog or leave the page, you won’t be able to see the token again, so be sure to copy it.
Nickname: A nickname allows you to override the default platform name with something more meaningful to you. This can be useful if you have multiple accounts on the same platform.
Domain ID, Name, URL, and API Key:
FlexOffers creates separate API keys for each domain you use in FlexOffers. You will need to set up a separate integration for each account you connect.
To connect a FlexOffers account, you will need the Domain ID, Domain Name, Domain URL, and API Key for each domain you connect. All four of these can be found on the API Keys page
.Log in to your FlexOffers
account.Navigate to Data Feeds → Web Services → API Keys
.Copy the Domain ID, Domain Name, Domain URL, and API Key for the domain and connect the network.

Nickname: A nickname allows you to override the default platform name with something more meaningful to you. This can be useful if you have multiple accounts on the same platform.
WebServices Password:
The Web Services password is different from the one used to access the NetAffiliation platform. To generate the Web Services password:
Log in to your NetAffiliation (Kwanko) account.
Next, select Tools → Deduplication → Web Services.

XML Feed URL:
To connect your NetAffiliation account, you will need the URL for the XML feed of your campaigns. This can be found on the same page as your Web Services password. Be sure to copy the entire link.

Once you have filled out all four sections, select Connect in the bottom left corner.

Nickname: A nickname allows you to override the default platform name with something more meaningful to you. This can be useful if you have multiple accounts on the same platform.
Application Key + User API Key:
When on the Partnerize dashboard, navigate to the Partnerize logo in the top left and select it to open the drop-down menu.
Select Settings → Your account.
You should now see your Application Key and User API Key.

Nickname: A nickname allows you to override the default platform name with something more meaningful to you. This can be useful if you have multiple accounts on the same platform.
Username: Enter the Username you use to log in to your PepperJam publisher account.
Password: Enter the Password you use to log in to your PepperJam publisher account.
API Key:
In your PepperJam account, navigate to the left menu bar and select Resources → API Keys.

Once selected, you'll load to a new page where you will either see your already generated API Key or have the option to generate a new key.

What currency does this platform report in?: An ISO 4217 currency code
is required (e.g., USD, EUR, GBP, etc.). Select the currency that is displayed in your PepperJam account.
Nickname: A nickname allows you to override the default platform name with something more meaningful to you. This can be useful if you have multiple accounts on the same platform.
Username: Enter the Username you use to log in to your Post Affiliate Pro publisher account.
Password: Enter the Password you use to log in to your Post Affiliate Pro publisher account.
Domain: Your domain URL is required. Exclude the http or https prefix (e.g., company.postaffiliatepro.com or affiliatecompany.com).
What currency does this platform report in?: An ISO 4217 currency code
is required (e.g., USD, EUR, GBP, etc.). Select the currency that is displayed in your Post Affiliate Pro account.
Nickname: A nickname allows you to override the default platform name with something more meaningful to you. This can be useful if you have multiple accounts on the same platform.
Username: Enter the Username you use to log in to your Rakuten publisher account.
Password: Enter the Password you use to log in to your Rakuten publisher account.
SID: Select the relevant SID from the list. Your site ID number is at the top right of the homepage.

Nickname: A nickname allows you to override the default platform name with something more meaningful to you. This can be useful if you have multiple accounts on the same platform.
GraphQL Access Token:
Log in to your Refersion Marketplace account.
Select your username in the top right-hand corner, then select Edit Your Profile.

Scroll down until you see
![[Code]](https://paligoapp-cdn-eu1.s3.eu-west-1.amazonaws.com/impact/attachments/f01cdffa431a4d75ff09c130b66974d4-5c4a4c80624c5e0445454464858bf97d.svg) Your GraphQL Token. Your API key should be listed in the section just below it.
Your GraphQL Token. Your API key should be listed in the section just below it.If you do not see the token, you may need to create a new token by selecting Generate New Token.

Nickname: A nickname allows you to override the default platform name with something more meaningful to you. This can be useful if you have multiple accounts on the same platform.
Publisher ID, Client ID and Client Secret:
Log in to your Skimlinks account.
In the top menu bar, select Toolbox → APIs → API Authentication credentials.
Here you will find all three credentials.

Nickname: A nickname allows you to override the default platform name with something more meaningful to you. This can be useful if you have multiple accounts on the same platform.
API Key + Secret Key:
To find your API Key and Secret Key select the key next to the site that you want to onboard.

Here you will find your API Key and your Secret Key. Alternatively, select Generate Secret API Key to generate your keys.

What currency does this platform report in?: An ISO 4217 currency code
is required (e.g., USD, EUR, GBP, etc.). Select the currency that is displayed in your Sovrn account.
Nickname: A nickname allows you to override the default platform name with something more meaningful to you. This can be useful if you have multiple accounts on the same platform.
Username: Enter the Username you use to log in to your Tradedoubler publisher account.
Password: Enter the Password you use to log in to your Tradedoubler publisher account.
ID + Client Secret:
To generate the Id & Client Secret, navigate to Account → Clients
.
Select
![[Add]](https://paligoapp-cdn-eu1.s3.eu-west-1.amazonaws.com/impact/attachments/f01cdffa431a4d75ff09c130b66974d4-1eb87a593a1ac0d9c10f6162b1175f95.svg) Add client in the upper right corner.
Add client in the upper right corner.
Then on the Add client page, call the new token Trackonomics (Please Do Not Remove) and select Save.

A success message will appear containing the Client Secret. Additionally, a record will show up with the ID.

Nickname: A nickname allows you to override the default platform name with something more meaningful to you. This can be useful if you have multiple accounts on the same platform.
Customer ID + Passphrase:
To connect to TradeTracker, your Customer ID and Passphrase for each TradeTracker Network you use is required (not your username/password).
You will need to set up a separate connection for each TradeTracker network you work with. For instance, if you’re active in TradeTracker Spain, TradeTracker Belgium, and TradeTracker Brazil, you would need to set up three separate TradeTracker integrations in Affluent.
In the top-right menu bar, select
![[Settings]](https://paligoapp-cdn-eu1.s3.eu-west-1.amazonaws.com/impact/attachments/f01cdffa431a4d75ff09c130b66974d4-32aa3ee2fe416b90bb36d8c3deadab67.svg) [Settings].
[Settings].
Select the TradeTracker country network you want to connect.
Next, navigate to Creatives → Web Services.

On the right, below Access you should see your Customer ID and Passphrase.

Nickname: A nickname allows you to override the default platform name with something more meaningful to you. This can be useful if you have multiple accounts on the same platform.
Username: Enter the Username you use to log in to your Webgains publisher account.
Password: Enter the Password you use to log in to your Webgains publisher account.
Which network do you want to log in to?:
This option should mirror the option found on your login screen above the Username and Password fields.

