
Email workflows can help automate communications with your partners by sending emails to specific partner segments. You can select a workflow template that includes pre-configured segments and example email copy, or create an email workflow from scratch. Once activated, email workflows run once per hour.
In most situations, we recommend starting from a template workflow and adjusting the segment conditions to meet your needs. If no template workflows cover your use case, then you can create a custom workflow without the suggested partner segment conditions or email copy.
From the left navigation menu, select
![[Engage] v2](https://paligoapp-cdn-eu1.s3.eu-west-1.amazonaws.com/impact/attachments/f01cdffa431a4d75ff09c130b66974d4-aa671735ec2b65af79961eaf59ab60af.svg) [Engage] → Partners → Automation → Workflows.
[Engage] → Partners → Automation → Workflows.At the top-right corner of the page, select Create Workflow → Email Workflow.
If you don't have existing workflows, then Create Workflow is displayed in the center of the screen.
From the Engage with my partners section, select an email workflow template to get started.
A workflow template includes a pre-configured segment and initial copy for the content of the email. Some templates include multiple workflows that are chained, meaning that a sequence of actions will be taken based on the workflows' configuration.
Templates with multiple workflows are indicated by colored icons on the template card. If you chose a chained template, then you'll need to select Edit below the first workflow to open the workflow creation screen.
Template
Description
Automate prospect invites
(Performance & Creator)
Send an email invite when you add a partner to Prospects, follow up 7 and 14 days after inviting, and auto-accept them when they sign up.
Partner/Creator Onboarding
(Performance & Creator)
Send automated onboarding emails to new partners or creators to quickly get them promoting.
Unlock the power of top creators
(Creator only)
Approve top creators and reach millions of engaged followers.
Welcome & kickstart a new partner/creator
(Performance & Creator)
Send a welcome email to newly joined partners, then help them become productive by sending follow-up emails with onboarding materials. Emails sent via this workflow can only be sent in 1 language.
Celebrate a partner's first sale
(Performance only)
Congratulate partners on their first sale with a custom message.
Celebrate top-performing partners
(Performance only)
Congratulate partners on achieving a milestone within a specific time frame.
Partner/Creator reactivation
(Performance and evergreen Creator programs only)
Automate inactive partner re-engagement with emails at 3 specific intervals. You can adjust the intervals when you set up the workflows.
Enter a brief Workflow Name of up to 50 characters.
Optionally, enter a Description.
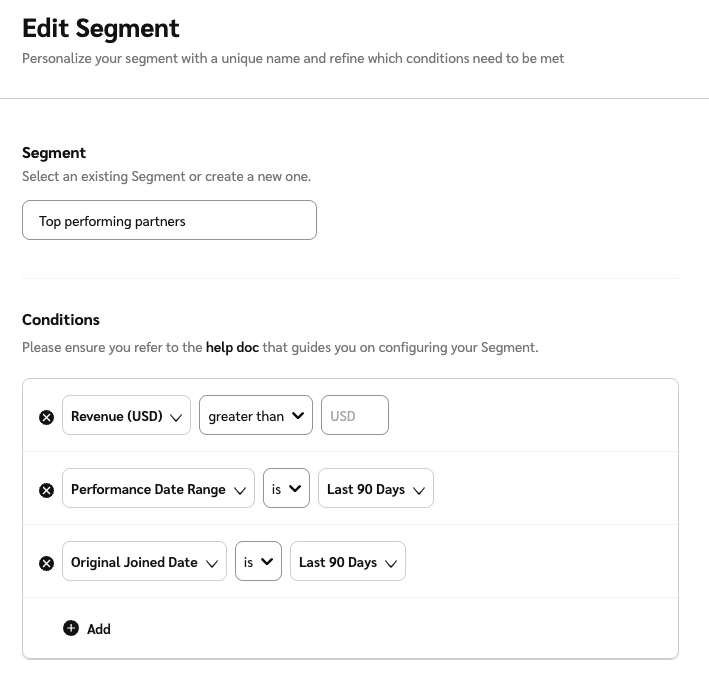
Set up the Partner Segment to which this workflow should apply. A segment will be pre-configured for you, and you can make adjustments as needed.
For important tips and detailed examples specific to setting up your partner segments, refer to Partner Segments for Email Workflows Explained.
Within the segment selection field, select
![[Edit]](https://paligoapp-cdn-eu1.s3.eu-west-1.amazonaws.com/impact/attachments/f01cdffa431a4d75ff09c130b66974d4-e61063d693316495c46ce944a80f6e34.svg) [Edit].
[Edit].Review the segment setup and make any desired changes.
Optionally, select
![[Add]](https://paligoapp-cdn-eu1.s3.eu-west-1.amazonaws.com/impact/attachments/f01cdffa431a4d75ff09c130b66974d4-568fc079a417d45c3469dad1ade0b41f.svg) [And] to add more conditions.
[And] to add more conditions.
Select Preview Segment Partners to see which partners will be targeted by the workflow and confirm that the results meet your expectations.
Select Save at the bottom of the slideout.
Check your segment conditions carefully before saving! We recommend that you avoid making changes to a segment after your workflow has been activated.
In the Contact Type section, use the
![[Drop-down menu]](https://paligoapp-cdn-eu1.s3.eu-west-1.amazonaws.com/impact/attachments/f01cdffa431a4d75ff09c130b66974d4-d6b35853a9aa1f1fe6bd66da29bd09fa.svg) [Drop-down menu] to include or remove specific contact types from the email list.
[Drop-down menu] to include or remove specific contact types from the email list.Marketplace: Default email address for the partner account currently in the impact.com marketplace.
Custom: Custom contacts added manually or via the Import Prospect feature. The custom contact type is used when you have a lead list, sourced contacts, or met someone externally, and want to invite them to work with you.
In the Action Type section, set up the email that will be sent to your selected partners.
Select
[Edit] to adjust the body and settings of the template email, including any sign-up instructions or dynamic content.If you are using the Partner Reactivation template, don't remove the link—it redirects partners to a page where they can quickly and easily grab their tracking links and start promoting.
Complete your email information:
Optionally,
![[Toggle on]](https://paligoapp-cdn-eu1.s3.eu-west-1.amazonaws.com/impact/attachments/f01cdffa431a4d75ff09c130b66974d4-84d1224fd3bb6ba94b899febe2021eaa.svg) [Toggle on] the Messaging Template setting to apply an existing messaging template, then select a template from the [Drop-down menu].
[Toggle on] the Messaging Template setting to apply an existing messaging template, then select a template from the [Drop-down menu].Name: The name that recipients will see when they receive the email.
Email: The email address from which the email is sent.
Reply to: The email address that partners will contact when they reply to this email.
Cc/Bcc:
[Toggle on] to include a Cc or Bcc email recipient in addition to the partners in your chosen segment.Subject: The subject of the email.
Content: Use the WYSIWYG editor to create or edit your newsletter content.
Optionally, below Insert a signup link, select the
[Drop-down menu] to select one of your template terms, then select Insert. This will add a Join my program button to the content that acts as a sign-up link to your template terms.Optionally, insert other dynamic fields into your newsletter. You can see the dynamic fields available by selecting
![[Add]](https://paligoapp-cdn-eu1.s3.eu-west-1.amazonaws.com/impact/attachments/f01cdffa431a4d75ff09c130b66974d4-1eb87a593a1ac0d9c10f6162b1175f95.svg) [Expand] to the right of the option.
[Expand] to the right of the option.
If you want this email to be saved for future re-use, then
[Toggle on] Save as new messaging template and enter a messaging template Name.Select Done at the bottom of the slideout. Alternatively, you can select Send test email. The test will be directed to the email address connected with your user account.
Select Activate Workflow or Save as draft.
Alternatively, if you selected a template that includes multiple workflows, select Save and continue setting up the other workflows. When all workflows have been set up, select Activate Workflows to launch them.
Activated workflows process automatically at the top of the hour.
Draft workflows can be accessed from the main Workflows screen.
From the left navigation menu, select
[Engage] → Partners → Automation → Workflows.At the top-right corner of the page, select Create Workflow.
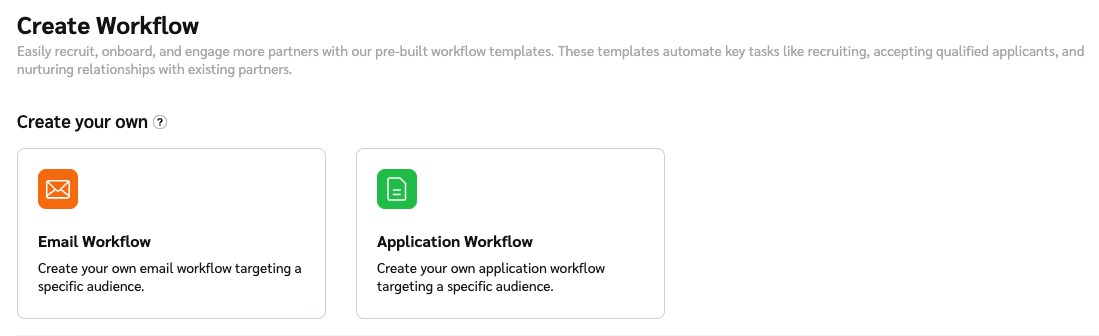
If you don't have existing workflows, then Create Workflow is displayed in the center of the screen.
Below Create your own, select Email workflow.
Multiple email and application workflows can work together to engage with your partners and process their applications. To set up multiple workflows with complementary segment conditions, repeat the process above, starting on the Workflows screen.
Set up your Partner Segment.
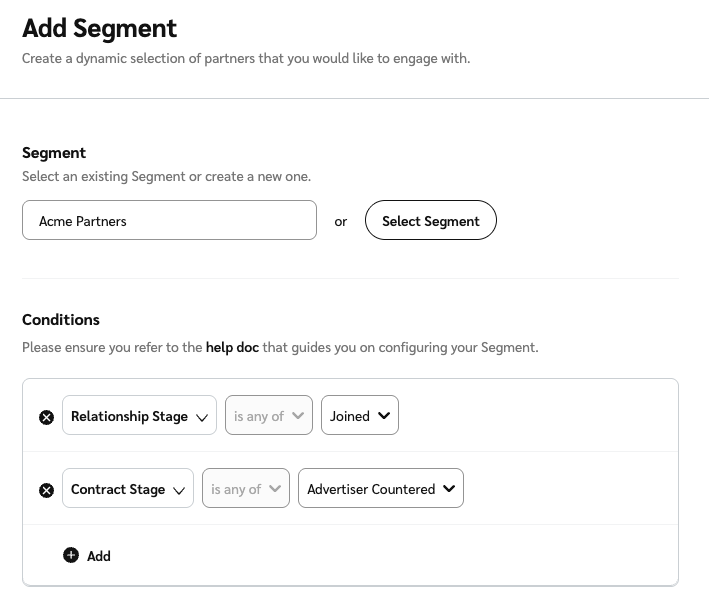
Select Add Segment.
In the slideout, choose an existing segment from the drop-down list, or select Create new segment.
Set up the segment conditions.
At least one segment condition is needed. Refer to Partner Segments for Email Workflows Explained for complete details, best practices, and setup examples.
Select
[And] to add another condition.
Select Preview Segment Partners to see which partners will be targeted by the workflow and confirm that the results meet your expectations.
Select Save at the bottom of the slideout.
In the Action Type section, set up the email that will be sent to your selected partners.
Refer to the Set up the email section above for more information.
Select Activate Workflow or Save as draft.
Alternatively, if you selected a template that includes multiple workflows, select Save and continue setting up the other workflows. When all workflows have been set up, select Activate Workflows to launch them.
Activated workflows process automatically at the top of the hour.
Draft workflows can be accessed from the main Workflows screen.
You can edit, pause, or delete a workflow at any time.
From the left navigation menu, select
[Engage] → Partners → Automation → Workflows.Select the Email tab.
Hover your cursor over the email workflow you want to manage.
Select View Report to view statistics related to this workflow's opens, clicks, and bounced emails.
Select Edit to adjust your workflow settings.
Select
![[More] vNext](https://paligoapp-cdn-eu1.s3.eu-west-1.amazonaws.com/impact/attachments/f01cdffa431a4d75ff09c130b66974d4-73f43076a692f2dcc8960037fabdca9c.svg) [More] to access the Activate, Pause, Duplicate, Issue Log, or Delete options.
[More] to access the Activate, Pause, Duplicate, Issue Log, or Delete options.
Yes. The partner segment is limited to 10,000 email addresses. If your segment conditions result in more than 10,000 email addresses, then no emails will be sent. Reach out to your CSM or contact support to help you troubleshoot your segment configuration.