
You can reject a partner's application to your program with a reject message set up via workflows. This message could help the partner understand why their application was rejected, how to rectify the issue, and possibly re-apply.
In the left navigation menu, select
![[Engage] v2](https://paligoapp-cdn-eu1.s3.eu-west-1.amazonaws.com/impact/attachments/f01cdffa431a4d75ff09c130b66974d4-aa671735ec2b65af79961eaf59ab60af.svg) [Engage] → Partners → Automation → Workflows.
[Engage] → Partners → Automation → Workflows.Select Create Workflow in the upper-right corner of the screen.
Alternatively, find an existing workflow you want to update, hover your cursor over it, and select Edit.
Fill in the required fields. See the workflow form reference for further guidance.
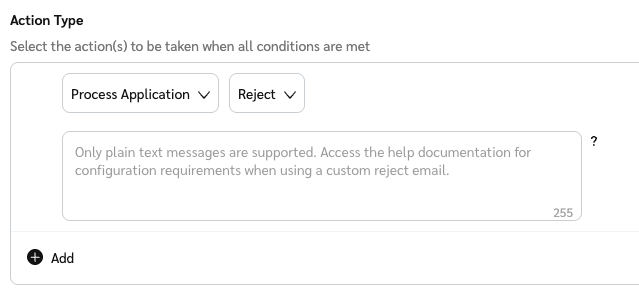
In the Action Type section, use the
![[Drop-down menu]](https://paligoapp-cdn-eu1.s3.eu-west-1.amazonaws.com/impact/attachments/f01cdffa431a4d75ff09c130b66974d4-d6b35853a9aa1f1fe6bd66da29bd09fa.svg) [Drop-down menus] to select Process Application and Reject.
[Drop-down menus] to select Process Application and Reject.A message box will appear where you can type a custom reject message that will be sent to the partner.
Note the character limit of 255.
Once you're done building out your workflow, select Create or Save.
If you make use of custom program-specific rejection emails, you'll need to update the email body to include a {rejectReason} token. This will ensure that your custom Workflow reject message is included in the rejection email.
From the top navigation bar, select
![[User]](https://paligoapp-cdn-eu1.s3.eu-west-1.amazonaws.com/impact/attachments/f01cdffa431a4d75ff09c130b66974d4-ec4c7b9aa5792fe725406b280fb272b1.svg) [User profile] → Settings.
[User profile] → Settings. On the right-hand side under Branding, and select System Emails and UI Messages.
Navigate to the Rejection Email field and select
![[Edit]](https://paligoapp-cdn-eu1.s3.eu-west-1.amazonaws.com/impact/attachments/f01cdffa431a4d75ff09c130b66974d4-9ecc39a52fdbd635974cf68e032795e2.svg) [Edit].
[Edit].Select
![[Radio button]](https://paligoapp-cdn-eu1.s3.eu-west-1.amazonaws.com/impact/attachments/f01cdffa431a4d75ff09c130b66974d4-b7d91d1c012267bd96951fe6c2b643a4.svg) [Radio button] Send program specific rejection email.
[Radio button] Send program specific rejection email.In the Subject field, input a custom subject for the email.
In the HTML Email Body field, input your customized email message with any relevant HTML code.
You can add special tags in the text that get dynamically replaced when the email is generated.
When setting a rejection message, make sure to include the tag
{rejectReason}.
Select Save.

